Complete guide to API Gateway and SQS integration
Published 19 September 2021
How to design a highly scalable event processing architecture using AWS API Gateway and SQS to integrate with your existing REST API
When designing a REST API there are often times that you need to handle a specific route(s) asynchronously. This can be due to any number of reasons including:
- handling a large number of concurrent API requests for a specific route without requiring the application server to be scaled
- long running database queries
- calling a third party API that has known latency issues
One common way of solving for this is to put data from the incoming HTTP request onto a message queue and then process the messages asynchronously by a worker in another service. This works great for jobs like handling analytics events where the client only needs to know that the API received the data but doesn't really care or need to know about what happens after the data is received.
There are a number of excellent message queues on the market that can be used for this kind of architecture (RabbitMQ, ActiveMQ, etc). Amazon Web Services (AWS) also has a proprietary paid managed service called Simple Queue Service (SQS for short) that is also excellent and can scale to handle virtually any load and because of this will be the queue of choice for this article.
Amazon Web Services (AWS) is made up of a suite of free and paid services that are all proprietary to AWS so if you want a fully open source self-managed solution this isn't the article for you. But, if you want a highly scalable infrastructure that requires almost no maintenance from your team, AWS API Gateway and SQS can be combined fairly easily with a simple integration template. API Gateway has excellent integrations with a growing list of AWS services as well so different use cases can be solved in a similar fashion to what we will be building in this article.
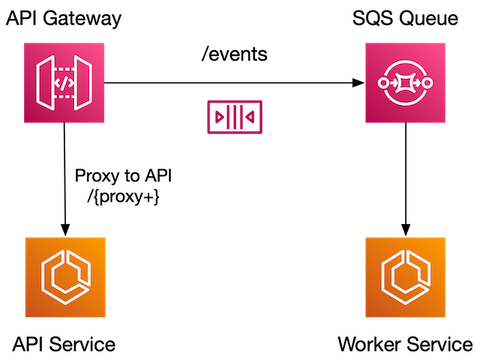
This article will walk through how to setup an AWS API Gateway using an OpenAPI specification for our API that will automatically push HTTP POST requests to a specific route /events directly onto an SQS queue. We will also design this to allow you to proxy the remaining routes to an existing REST API. This allows you to create a single API Gateway in front of your application server(s) and gain all the other benefits of having an API Gateway in front of your services. The high level diagram below shows this basic architecture.
Requirements
This tutorial touches on several technologies and I assume at least some passing knowledge of the following: SQS, API Gateway, OpenAPI. I also assume that you have an active AWS account and have at least logged in and looked around. Throughout the article I link off to all the relevant documentation so if you don't have experience with these technologies, you can hopefully use this article as a launching off point to learn about them.
CloudFormation
In this article I am going to be using a CloudFormation template to build this sample architecture. CloudFormation was Amazon's first of several Infrastructure as Code (IaC) solutions. I'm choosing this over other IaC options from Amazon or third parties largely for simplicity and because it requires no external applications or libraries. All you need in order to use CloudFormation is an AWS account, a text editor and a rudimentary grasp of YAML. Many AWS tutorials and blog posts use loads of screenshots of the [AWS Console](https://aws.amazon.com/console/){:target="blank"} to walk through setting up infrastructure but there are are number of reasons this isn't ideal:
- the screenshots can easily be outdated when AWS changes it's console UI
- you can't rollback your infrastructure changes without manually going in and removing every resource that was created by hand
- it's much faster to run a CloudFormation template to stand up infrastructure
- you can't see the all the resources at once nor see dependencies between resources
- if you make a mistake in your template you simply delete it and roll all the resources back, make changes to your template and run it again vs manually going into each service and finding and deleting resources and then filling all the forms out again
There are other popular options for IaC such as Terraform and Serverless. I strongly recommend using some form of IaC if you are designing AWS infrastructure. One caveat is, in this tutorial for the deployment of the CloudFormation stack, I do use screenshots of the Stack creation steps to avoid forcing users to download and learn more tooling to follow along which would make this tutorial much longer and needlessly complicated. Hopefully AWS doesn't change their CloudFormation UI any time soon!
CloudFormation supports JSON and YAML as template languages. I will be using the YAML syntax for this article. Love it or hate it, it's my experience having used both in production systems is that YAML is a lot easier to manage and far less noisy without all the brackets.
Template Parameters
The first thing to consider in a CloudFormation template are template parameters for values that you know will change when deploying to different environments such as dev, qa, stage, production. Below is the initial set of parameters that we will need in order to allow for multi-environment deployment. Always consider moving hard coded values in your templates to the Parameters section if they could potentially change between environments.
NOTE: These template parameters are used in later sections of the template file snippets.
Resources
- AWS::SQS::Queue
- AWS::SQS::QueuePolicy
- AWS::IAM::Role
- AWS::ApiGateway::RestApi
- AWS::ApiGateway::Account
- AWS::ApiGateway::Deployment
- AWS::ApiGateway::Stage
AWS::SQS::Queue
The SQS Queue resource is very simple to configure in Cloudformation using only a few lines of YAML. For this architecture I am also going to add a Dead Letter Queue which will allow for debugging when a message cannot be processed by the worker tasked with pulling messages off the queue. An example use case is that a message is pulled off the queue by a worker and every time it attempts to process the message it crashes (say due to a malformed payload and bad error handling in the worker code).
In that scenario after a period of time has passed in seconds(configurable via the VisibilityTimeout attribute of the queue) the message will be put back on the queue. You should configure this value to coincide with roughly how long processing a message should take in general. If the message continues to fail processing and is placed back on the queue a given number of times (configurable via the maxReceiveCount attribute of the RedrivePolicy of the queue), SQS will place the message onto the Dead Letter Queue so that the team can review the messages and determine the cause of the failure. Here's the template code for setting up the queue in CloudFormation.
NOTE: !Sub is the AWS YAML syntax for string substitution where the interpolation of the string uses ${} to in this case the parameter QueueName
AWS::SQS::QueuePolicy
The QueuePolicy resource is needed in our architecture to allow API Gateway the ability to send messages to our SQS queue. Access policies are a rather large topic and is out of scope for this tutorial but I highly recommend you read up on how and why policies and permissions are used before you attempt deploying something like the architecture this tutorial is describing to production.
You can read more about AWS policies in detail here.
NOTE: !GetAtt is the AWS YAML syntax for retrieving the value for an attribute of the given resource, in this case the `Queue` resource defined in the AWS::SQS::Queue resource definition.
!Ref is the AWS YAML syntax for returning the value of a resource itself which is often the ARN of the resource but can in the case of an SQS Queue is the URL of the queue.
In the above sample the Principal is set to "*" which is likely not what you would want in production. Generally you would limit it to only your AWS account(s) so your Principal attribute may end up looking something like this:
AWS::IAM::Role
IAM Roles allow for a set of permissions that can be attached to resources such as API Gateway. By using IAM Roles in your CloudFormation template you can restrict access to specific functionality. In this example we are going to create an IAM Role that allows API Gateway to handle a route into our API and pass the request to an SQS queue. Without this IAM role configured that integration wouldn't be allowed. We also are giving the role permissions to read and write CloudWatch logs which is needed when creating the AWS::ApiGateway::Account resource later in this tutorial.
AWS::ApiGateway::RestApi
The RestApi resource is the main component of this architecture. There are different types of API Gateways available including REST, HTTP and WebSocket APIs all of which are suited for different use cases. In this example we want to use a REST API as it supports both direct integration with AWS Services as well as provides us with the ability to use OpenAPI or Swagger to define our API.
API Gateway also supplies what are called vendor extensions to the OpenAPI schema which allow you to use standard OpenAPI specification syntax along with custom integration features allowed by AWS. You can alternatively code much of this manually in CloudFormation but in my experience it's easier to understand using the AWS extensions directly in the OpenAPI schema itself when possible.
Here's the full AWS::ApiGateway::RestAPI resource definition for this project:
I won't be able to cover every aspect of this resource in this article, in particular the OpenAPI defined components as those are well documented in the OpenAPI documentation.
The most relevant section of the AWS::ApiGateway::RestApi resource is the Body element. The Body element allows you to directly use your OpenAPI schema as it's value. All of the standard concepts apply so if you're used to working in OpenAPI this should look familiar. What may be new is Amazon's use of Open API extensions which allow third parties to add their own custom attributes to the schema. In our case there are two in use in this API definition:
One thing to note is that because the OpenAPI schema definition is inside the body of the CloudFormation template, we have access to all the other resources that we have defined in the template.
SQS Integration Point
The x-amazon-apigateway-integration extension allows you to configure the integration of an AWS service, in our case SQS, directly inside the API Gateway Body element. As you will see if you look at the documentation to this extension linked above, there are myriad attributes available for this. For our use case we only need to configure seven of them as follows:
- credentials - for this we are using the IAM Role's Arn that we created as a resource. This role allows API Gateway to put messages on our queue.
- httpMethod - for our use case we are only allowing an HTTP POST method
- uri - this is the URI to the SQS Queue we created. Note that you have to build the URI as ARN's will not work for this type of integration.
- responses - this configures the default status code returned on success.
- requestParameters - when integrating with SQS you need to set the header for Content-Type to
application/x-www-form-urlencoded. - requestTemplates - this is a mapping of request method, headers, as well as query and path parameters to SQS messages. Internally in AWS these are Velocity templates and are documented here
- passthroughBehavior - this is configured as
neverwhich means the request payload is transformed using the requestTemplates value. - type - because we are integrating with an AWS service the type is set to
aws.
The x-amazon-apigateway-integration happens in the paths element under the events path. All the standard OpenAPI constructs apply here and the only addition is the use of this extension outlined above.
API Proxy
API Gateway's proxy capability is supported by a special path parameter which is defined as {proxy+}. By adding a path of /{proxy+} you are able to use another extension to OpenAPI that Amazon has added for catch-all routes called x-amazon-apigateway-any-method .
Instead of manually adding post, get, delete, etc to the OpenAPI specification with the same configuration set to proxy the requests, using this extension allows you create one path that handles all undefined paths. In this example this means that every route sent to the API Gateway that isn't /events will route to the endpoint in the x-amazon-apigateway-integration configuration, specifically the uri element. Two other important elements are the type element which is set to "http_proxy" and the httpMethod element which is set to "ANY" to allow all requests to pass through.
Because we don't have an application server setup to respond to proxy routes and adding that task to this blog would have turned this article into a small book, I used [JSON Placeholder](https://jsonplaceholder.typicode.com){:target="blank"} which is a simple, public API that will allow you to test this deployment without having to deploy additional resources in AWS. We can simply use our API Gateway's deployment URL and tack on any of the operations supported by JSON Placeholder and thhe requests will proxy through and give you the expected results (e.g. https://<YOUR-API-GW-DOMAIN>/LATEST/todos). In a real world scenario this would likely be the internal DNS endpoint of your REST API.
AWS::ApiGateway::Account
The Account resource specifies the IAM role that Amazon API Gateway uses to write API logs to Amazon CloudWatch Logs.
AWS::ApiGateway::Deployment
The Deployment resource deploys an API Gateway RestApi resource to a stage so that clients can call the API over the internet.
AWS::ApiGateway::Stage
The Stage resource creates a stage for a deployment. Both the Stage and Deployment resources have properties of MethodSetting that have attributes for configuring API throttling and canary deployments.
Stacks
CloudFormation templates can be uploaded into the AWS Console or deployed via the AWS CLI or AWS IDE toolkits such as the AWS Toolkit for IntelliJ IDEA or AWS Toolkit for Visual Studio Code. I'm going to use the console for instructions for this part of the tutorial as it doesn't have any required dependencies to install that the AWS CLI or IDE plugins would.
I've created a gist that contains the full CloudFormation template so download that file before moving forward.
To create this stack head over to the AWS Console for CloudFormation here. On the CloudFormation console home page, click on the Create Stack button or if you already have stacks running in your account, you should land on the Stacks list view and from there you can click Create Stack and select "With New Resources(standard)". This should take you to a screen that looks like this:
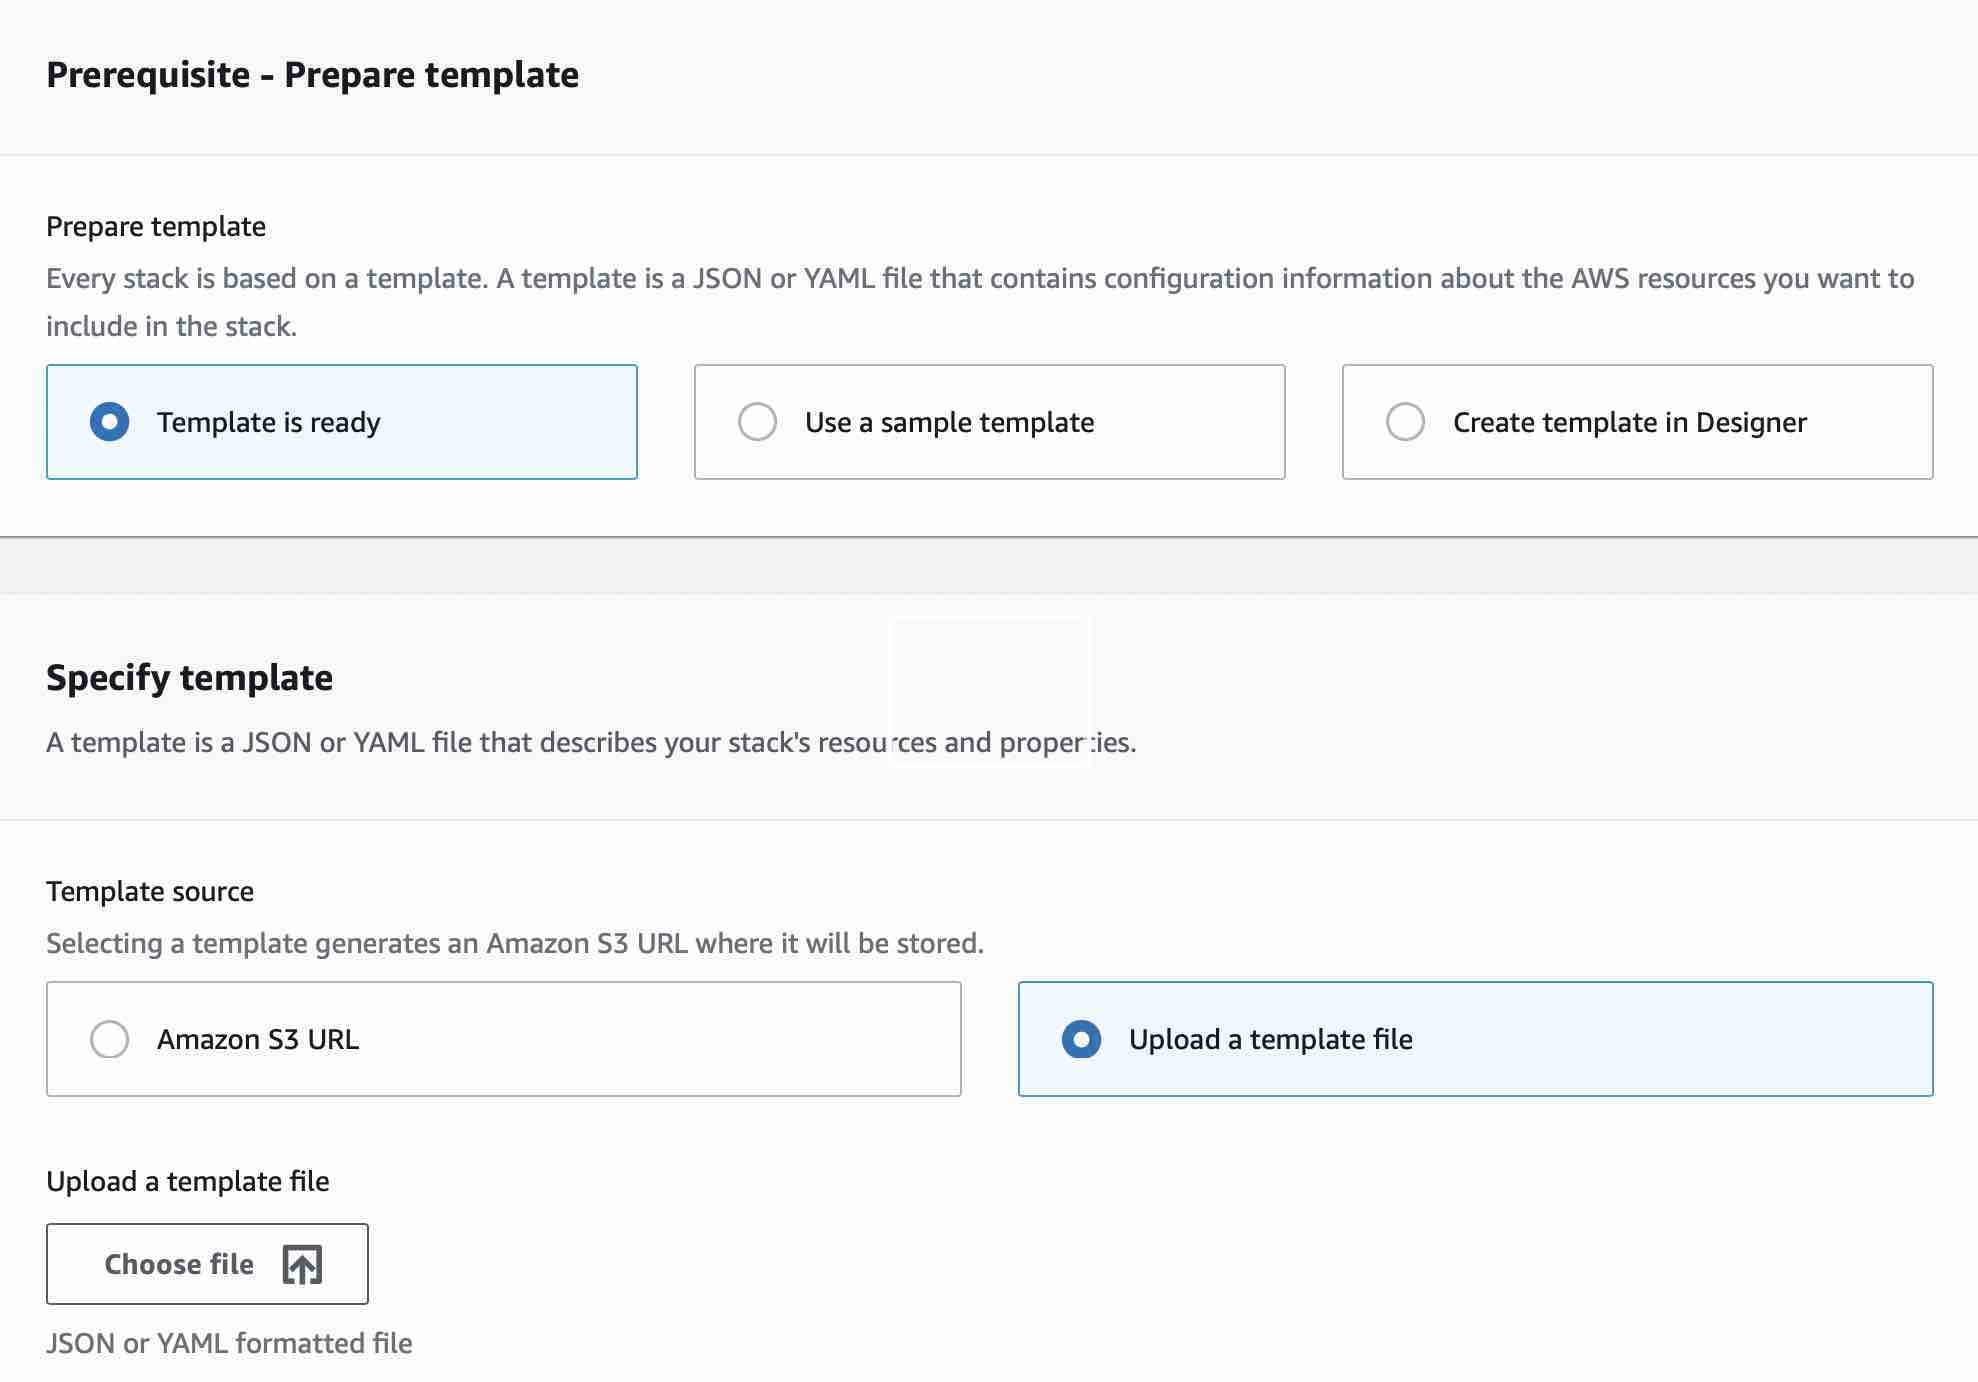
Ensure that in the Prepare Template section that Template is ready is selected, and in the Template source ensure Upload a template file is selected. Next click Choose File and select the downloaded CloudFormation from the gist linked to above. Once selected click the Next button and you will be presented with the Specify Stack Details page:
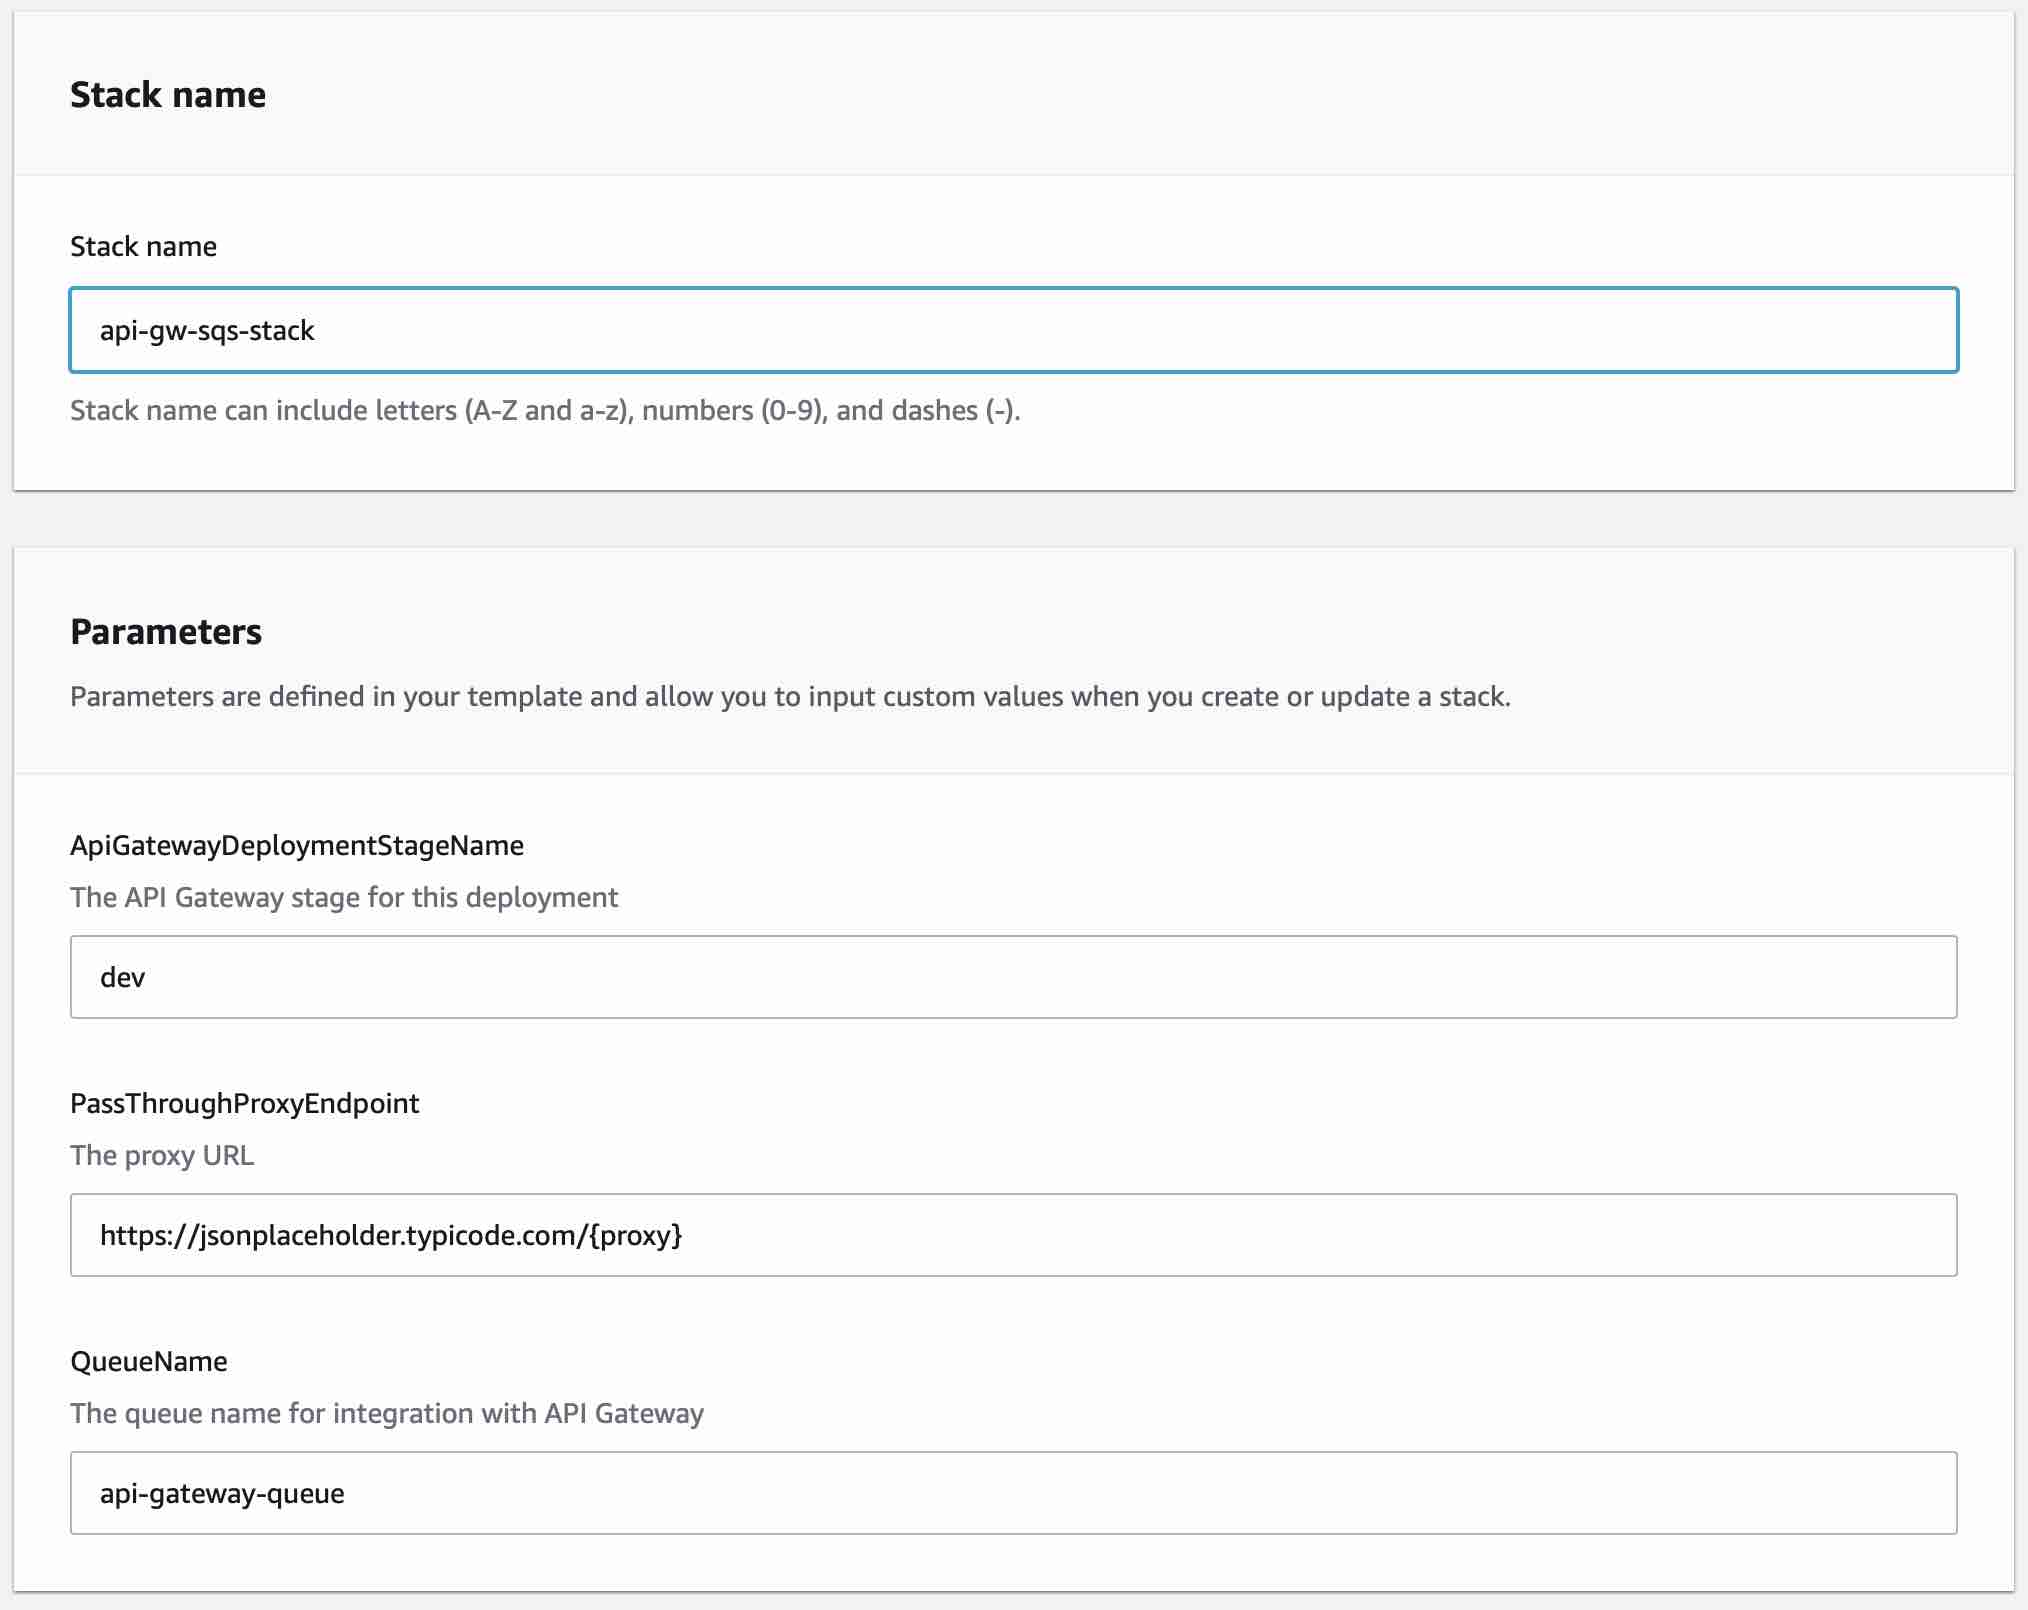
Specify a stack name in the blank field and click Next and you will be taken to the Configure stack options screen. Here you can leave everything as is and click Next to move to the Review <your stack name> page. Now you can review your stack and click the checkbox that states "I acknowledge that AWS CloudFormation might create IAM resources with custom names.". This warning is there to make sure you understand that you are creating IAM Roles which gives permission to parts of your account so that you don't inadvertantly open up security holes in your account that someone could exploit. Always review any code you download off the internet including mine to ensure it's not doing something you don't understand. If you are uncomfortable with the permissions you are configuring in this tutorial I suggest spending more time reading the AWS IAM documentation and reviewing what this tutorial is allowing before you click Create Stack.
Once you have agreed and clicked Create Stack, you will now be taken to an event viewer of the creation of your stack where you can watch the resources being created. Clicking the Refresh arrow button will show any current events if you're feeling impatient but the screen should update on its own as well. It typically takes about 30 seconds to build this infrastructure although it does depend on how busy AWS services are and could take more or less time.
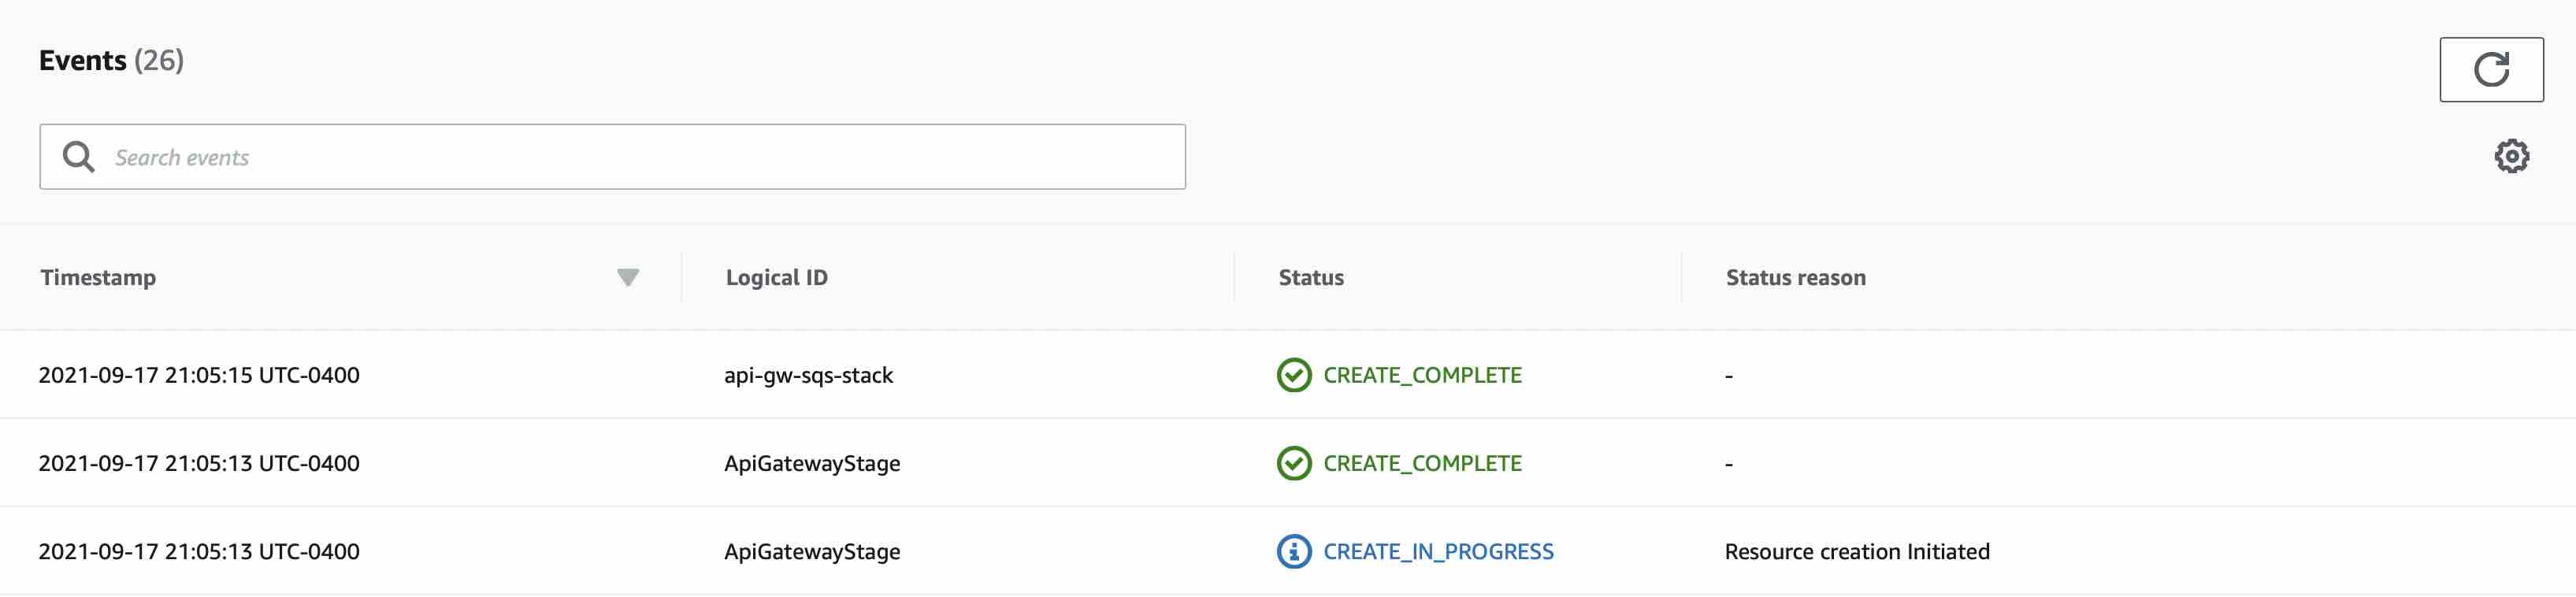
You may notice on the left side of the event log that it will say CREATE COMPLETE once it's done generating the resources in the template. If you don't see that show up in a reasonable amount of time (a minute or two) try hitting the refresh button or reloading the page. If there are any errors the stack, they will be shown in red in the event log and the stack will rollback the resources.
If you do run into errors you can always hit the DELETE button to rollback all the resources and start over.
After you complete the testing procedures listed below, you can safely go to the Stacks page and delete the stack that you just created. Deleting a stack will rollback all the resources you created and tear down everything to avoid leaving any IAM Roles open and also any potential costs charged by AWS. One other thing to note is that it's VERY important as you start working with CloudFormation that you understand what gets destroyed when you do this. e.g. if have an SQS queue as part of a stack you are deleting, you will erase all unread messages that may have been on the queue with no recourse and AWS will not warn you of this (unlike S3 buckets where if you try and rollback an S3 bucket that has files in it will fail by default). So a reminder is that when doing this in production or other staging environments always be extremely careful when deleting a stack that other people may rely on.
Testing
On the api-gw-sqs-stack page, click the Outputs tab and copy the value of the ApiGatewayDeploymentURL key in the list. This is your new API endpoint.
I've created a Postman collection that you can download here [] and import into Postman to test your new API.
Here are curl commands if you prefercurl.
In both Postman and curl just change the YOUR-API-ENDPOINT-HERE to your API Gateway's deployment domain.
After POSTing a test message to the /events route, you should go to the SQS Console and confirm that the message you sent to the API Gateway is now durably stored in your queue. Instructions for using the SQS Console are here.
End Notes
When designing complex systems it's important to try and stave off any immediate leanings towards not invented here syndrome and see if there are existing off the shelf components that provide high value to your organization. Once you do that work, you can do a proper analysis of cost, value, fit with your organizational goals, etc.
While writing code is fun, maintaining code over years and managing all the dependencies during that time span is time consuming and potentially disastrous if you or your team inadvertantly skips a major security patch. In this use case, relying on existing infrastructure and technology can make sense if your team and existing architecture can support it. Instead of adding more code to a Ruby on Rails or Spring Boot API to add a route that accepts a POST and writing the handler code to parse the message, put the message on the queue, ensure receipt of the message on the queue and then return a response, I would, in most cases, choose to leverage the API Gateway integration with SQS to handle all of that for me. Similar to music, with software development and software architecture, less is often more.
I also have a couple of comments related to cost of this architecture. API Gateway and SQS are paid services so if you're handling hundreds of millions or billions of messages a month you will have a hefty bill to pay for using this architecture so please be sure you study your use case in the light of Amazon's pricing model for these services. Handling those types of traffic loads using a home rolled API Gateway pointed at your application server likely would have significant costs as well. That said both API Gateway and SQS have very generous free tiers so in my opinion it's very worthwhile looking into it as a possible solution.
Last but not least, you may be saying to yourself, "what if I need to receive a response that is the result of the asynchronously handled request!?". This is a very valid question but it unfortunately has a much more complex answer. I do plan on writing an article about this in the future though so stay tuned!
Mike Engelhart
Software architect, developer, musician.
pocketgalaxy.io